Did you know that nearly 1 in 3 homeowners in the United States have taken on DIY projects? They’ve turned their living spaces into something new. With creativity and a few cheap materials, you can make any wall look amazing. These DIY wall art projects are great for adding your personal touch without spending a lot.
Custom artwork doesn’t have to break the bank. You can create expensive-looking DIY wall art with just a few simple items. Plus, these DIY wall art ideas are very affordable. This means you can make your own unique art for any blank space in your home.
Key Takeaways
- DIY wall art projects allow you to create personalized, affordable artwork for your home.
- A variety of materials and techniques can be used to make unique DIY wall art.
- DIY wall art projects offer a way to transform blank spaces and add your own style.
- Inexpensive materials and simple DIY skills can result in high-impact, custom wall decor.
- Embracing DIY wall art projects is a great way to personalize your living spaces.
Introduction to DIY Wall Art
If you want your home to feel truly yours, DIY wall art is the way to go. It’s perfect for beginners because it’s easy, fun, and won’t break the bank. Making your own decor lets you choose unique pieces that reflect your style.
You can use materials like wood, canvas, and textiles to create stylish custom art. This way, your walls can showcase your personal taste.
The Benefits of Creating Personalized Wall Art
Creating your own personalized decor has many advantages:
- It lets you show off your style in your home.
- DIY projects are often cheaper than buying art.
- It’s a fun hobby that makes you feel accomplished.
- Handmade art adds a special touch to your space.
| DIY Wall Art Project | Estimated Time | Difficulty Level | Materials Needed |
|---|---|---|---|
| Taped Pattern on a Drop Cloth | 2-3 hours | Intermediate | Drop cloth, painter’s tape, paint |
| Pressed Flowers | 1-2 hours | Easy | Pressed flowers, frame, glue |
| Layered Torn Paper | 30 minutes to 1 hour | Beginner | Colored paper, frame, tape |
“Creating your own wall art allows you to add a personal touch to your home and express your unique style.”
Watercolor Canvas Art
Big abstract art pieces often cost a lot. But, with watercolor paint on a canvas, you can make a unique piece for less. You don’t need to be an artist to make beautiful DIY watercolor art for your home.
This easy method for DIY canvas art with watercolors lets you make stunning wall decor in under an hour. You’ll need a foam brush, an empty condiment bottle, white canvas, watercolors, and paper towels.
Begin by using different watercolor techniques on the canvas. Let the colors mix and spread. After it dries, frame the abstract wall art with painted wood lattice strips. For big canvases, split it into quadrants to make painting easier.
“I was able to make this beautiful watercolor canvas art in just 10 minutes! It’s quickly become one of my favorite DIY projects.”
Watercolor canvas art is also fun for kids. It lets them be creative and learn about fine motor, math, and science. You can do it together or let each child make their own art with liquid watercolors, washi tape, and a white canvas or paper.
Whether you’re an artist or just want to decorate your walls, this DIY watercolor art project is a fun, easy, and affordable way to make amazing abstract wall art for your space.
Repurposed Door DIY Wall Art
Thinking outside the box can lead to amazing DIY wall art. You can turn an old door into a unique piece of art. It’s a simple way to give new life to old materials and make your space stand out.
Start by finding an old door. It could be from a cabinet, interior, or even an exterior screen door. The door should have character and interest. Next, prepare it for painting by sanding, cleaning, and priming.
There are many ways to paint the door. You can go for an abstract design with one color or bold, contrasting colors. Even a chevron pattern can add a modern touch.
This project is very flexible. You can make it fit your style and the look of your home. Whether you like modern or rustic, the door will be a standout piece.
After painting, add a protective coat to keep it looking good. Then, hang it on the wall. Enjoy your DIY wall art with repurposed materials that brings personality to your space.
| Project Details | Supplies Needed |
|---|---|
|
|
Neon Spray Paint Wall Art
Unleash your creativity and turn any space into a vibrant, eye-catching haven with DIY neon wall art. This simple project lets you personalize your home decor with neon spray paint’s bold, captivating hues.
To start, you’ll need a few basic supplies: dry-erase boards, a spray bottle filled with water, and neon spray paint colors. The dry-erase boards are the perfect canvas for experimenting and creating unique designs without the commitment of permanent materials.
Begin by misting the boards with water, then start spraying the paint and blotting the excess with paper towels. This creates a stunning, splattered effect that looks like neon lights. Keep repeating this, layering colors to get the intensity and depth you want.
For an extra touch, consider using stencils or masking tape for geometric patterns or custom shapes. This project’s versatility lets you adapt it to your personal style, making it a unique addition to your home decor.
Whether you choose a bold, neon-inspired accent wall or a playful gallery display, this DIY neon spray paint wall art is a simple, affordable way to add personality to your space. Embrace the trend of DIY neon wall art and turn your home into a captivating, vibrant oasis.
DIY Projects with Chevron Pattern
Wood Shim Chevron Wall Art
Make any room look amazing with a DIY chevron wall art project. It uses wood shims and starts at your local hardware store. You’ll need wood shims and spray paint in your favorite colors.
By mixing colors in a chevron pattern, you get a unique wall display. It adds personality to your space.
First, cut the wood shims at a 45-degree angle. Use a chop saw for this. Then, apply construction adhesive to the back of the shims.
Arrange them in a chevron pattern on your wall. Use a pneumatic nail gun to secure them with brad nails. After the adhesive dries, stain the shims in a dark “Ebony” tone. This complements the modern industrial look.
To add texture, surround the wall art with different materials. Use laminate flooring or vertical trim pieces. This project is great for bedrooms or dining rooms, adding rustic elegance.
“The chevron pattern adds a striking visual interest to any wall, and the use of wood shims makes this project both budget-friendly and customizable to your personal style.”
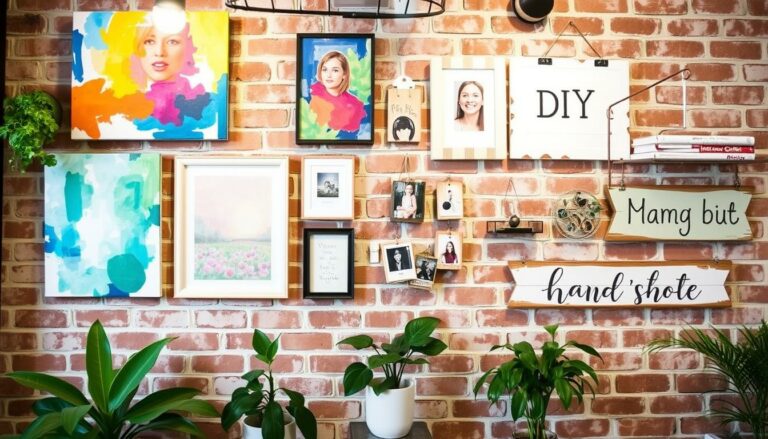
Gallery Wall with Unique Objects
Creating a DIY gallery wall is a great way to make your eclectic home decor truly yours. It’s all about showing off unique items that show your style and interests. You can use anything from vintage posters to family photos, or even things like cocktail napkins.
Choosing a color scheme is crucial for a gallery wall. Pick colors that go well together to keep it looking neat. A big piece can be the centerpiece, with smaller items around it to add interest.
Keep each item about 3 inches apart to avoid clutter. Mix up the way things are hung and the frames you use. Adding things like textiles can make your wall more interesting.
Make your gallery wall personal. Use digital prints, drawings, or family photos to make it special. A gallery wall tells your story and shows off your style and memories.
Find your items at thrift stores, flea markets, or Etsy. Choose pieces that mean something to you and fit your DIY gallery wall. With creativity, you can turn a blank wall into something amazing that shows off your eclectic home decor.

Lace and Embroidery Hoop Wall Art
Turn your walls into a charming canvas with DIY textile wall art made from lace and embroidery hoops. This easy project lets you create a unique piece that shows off your style. It adds elegance to any room.
Start by collecting different lace pieces. Place them over floral or patterned fabrics. Then, put them inside wooden embroidery hoops. You’ll need about $10 for materials, or less if you already have them.
Embroidery hoops cost around $1 each. This makes the project very affordable. You can finish it in under an hour, making your space uniquely yours.
For a neat look, use hoops of various sizes. For example, use 7 hoops in different sizes. The hoops are light, so hanging them is easy with small nails and a hammer.
To finish the look, use hot glue to attach the fabric edges to the hoops’ back. This gives a clean finish. Try different fabrics, textures, and colors to match your room’s style.
You can also use vintage doilies, embroidered towels, or old lace tablecloths for your art. This project lets you personalize your space and show off your creativity.
DIY Projects with Rope Art
Rope Imprint Wall Art
Discover the charm of DIY rope wall art for your home. You can make a unique wall decor with just a few items. Start by gluing 3 feet of rope onto a piece of wood or cardboard.
Then, paint the rope with acrylic paint. Press the rope onto cardstock for a striking effect. For a two-tone look, repeat the process with another color and twist the rope.
Once dry, frame the artwork for a standout display. Rope DIY projects let you add a personal touch to your home. From ottomans to baskets, rope’s versatility is endless.
Hemptique offers premium hemp craft ropes for over 25 years. Their ropes are great for jewelry, decorations, and more. Check out their collection for your next project.
“The beauty of rope-based DIY projects lies in their ability to add depth, texture, and a touch of the unexpected to any space.”
Looking to make a basket, ottoman, or doormat? Hemptique has ropes in cotton, jute, and sisal. Let your creativity shine and decorate your home with these ideas.
Pixel-Inspired Wall Art
Make your home stand out with a DIY pixel art project. It turns a simple plywood or MDF panel into a colorful, personal wall decoration. This method lets you make big, custom pixel art cheaply, adding a modern touch to any room.
Start by sanding and cleaning the wood panel for a smooth finish. Use a pencil to draw a grid of squares, about 2.5 inches each, on the whole panel. Then, pick out acrylic craft paint colors, arranging them from light to dark. Assign a color to each square and use tape to paint them, letting each dry before moving on.
To get a watercolor effect, mix a bit of water with the paint. This adds a beautiful, organic look to your pixel art. After painting all squares, hang your art and enjoy the DIY pixel art on your walls.
![]()
This easy guide lets you turn a plain wood panel into a stunning, modern wall decor piece. You can choose bold, bright colors or soft, earthy tones. Either way, your art will impress and make any space look better.
Framed Jewelry Wall Art
Turn your jewelry into beautiful wall art with this easy project. Use cheap frames from flea markets to make a display that shows off your favorite pieces.
Choose frames in sizes like 3″ x 5″ to 7″ x 8″ for small items. For bigger pieces, go for 14″ x 17″ or 16″ x 19″ frames. Cover them with dark velvet fabric, like black or red, for a fancy look. The velvet costs about $17.99 per yard, and you’ll need half a yard of each color.
Then, put your jewelry in the frames. Try different items like earrings, buttons, and coins. Use spray adhesive and E-6000 glue to stick them down. E-6000 glue is found in craft stores, hardware stores, and Walmart.
Let the frames dry overnight. Then, use hot glue, staples, or nails to hold the velvet in place. This project took about five hours to finish, using broken jewelry from over the years.
You’ll get a beautiful piece of wall art that also holds your jewelry. Hang it in your bedroom, bathroom, or anywhere you want a vintage look. For more jewelry, use frames that are 22 1/8″ x 17 1/8″ with a 20″ x 15″ art size. Space the hooks or eyelets 1/2″ to 1″ apart for better organization.
DIY Projects with Color Blocking
Unleash your creative flair and transform your living space with DIY color block wall art. This budget-friendly technique lets you play with vibrant hues and geometric patterns. It adds a personal touch to any room. Whether you’re a seasoned DIY enthusiast or a beginner, color blocking is an easy and versatile way to elevate your abstract home decor.
To get started, you’ll need a few basic supplies. These include a canvas or wooden board, acrylic paints in your desired colors, and a sharp blade or scissors. Start by sketching out your color block design. Then, use the blade or scissors to cut the canvas or board into the desired shapes and sizes.
Paint each section with your chosen acrylic colors, making sure to have clean, defined edges for a polished look. Once dry, arrange the painted pieces on the wall. Secure them with double-sided tape or adhesive.
- Sketch your color block design on the canvas or board.
- Cut the canvas or board into the desired shapes and sizes using a sharp blade or scissors.
- Paint each section with your chosen acrylic colors, allowing the paint to dry completely.
- Arrange the painted pieces on the wall and secure them with double-sided tape or adhesive.
For an extra touch of personalization, consider adding a custom frame around your DIY color block art. This simple step can elevate the finished piece. It transforms it into a true work of art that complements your home’s abstract home decor aesthetic.
Embrace the power of color blocking and let your creativity shine through. With a little imagination and some basic supplies, you can create a unique and eye-catching DIY color block wall art piece. It adds a vibrant, modern flair to any space.
Conclusion
DIY wall art is a fun and affordable way to change your home. You can make everything from colorful watercolor canvases to cool neon art. It’s all about showing off your style.
With different materials and methods, you can make unique pieces for your home. These projects are great for anyone who loves to create. They let you add your own special touch to your space.
DIY wall art lets you make your home truly yours. It’s a chance to show off your personality. So, get creative and see how DIY wall art can make your space amazing.
FAQ
What are the benefits of creating personalized DIY wall art?
What materials can be used for DIY wall art projects?
How difficult are DIY wall art projects for beginners?
Can DIY wall art be used to create large-scale artwork?
How can repurposed materials be incorporated into DIY wall art?
What types of color and pattern techniques can be used in DIY wall art?
Source Links
- 1. 15 DIY Wall Art Projects for a High-End Look on a Budget –
- 2. 32 DIY Wall Art Projects That Look Fancy But Anyone Can Do
- 3. Creative And Unique DIY Wall Art Ideas