
Did you know there are 32 creative wall art ideas to turn your blank walls into unique pieces? You can do it all without spending a lot of money. From turning thrifted canvases into abstract art to making old doors into eye-catching pieces, these DIY projects show that you can have custom art without breaking the bank. Let your creativity flow and show off your style with these affordable wall art ideas.
Key Takeaways
- Harness the power of inexpensive materials like thrifted canvases, old doors, and embroidery hoops to create unique wall art.
- Experiment with a variety of techniques, including painting, paper cutting, stenciling, and digital manipulation.
- Prioritize personalization by customizing colors, designs, and sentimental elements to suit your space.
- Discover budget-friendly DIY projects that can be completed in a few minutes or a few hours, catering to various skill levels.
- Elevate your home decor with easy-to-make, gallery-worthy wall art that reflects your personal style.
Transform Thrifted Canvases into Abstract Art
Turning thrifted canvases into abstract art is a great way to make unique wall art on a budget. You can use watercolors or acrylic paints to create stunning pieces. Try swirling, splattering, or layering colors for a truly unique look. This simple process can make your space stand out without costing much.
Unlock Your Creativity with Thrifted Canvases
Thrifted canvases are affordable and perfect for unleashing your creativity. Our research shows that a blank canvas can cost as little as $5. You can also find large paintings for under $25 at stores like Ross. For example, one painting was just $11, and a huge 4’x4′ piece was $59.99.
To start your project, you might need to apply gesso to the canvas. This covers any old artwork and can be done with the frame still on. After the gesso dries, you’re free to paint with watercolors or acrylics.
| Supplies Needed | Estimated Cost |
|---|---|
| Thrifted Canvas | $5 – $59.99 |
| Gesso | $4 – $8 |
| Acrylic or Watercolor Paints | $10 – $20 |
| Brushes | $5 – $10 |
| Total Estimated Cost | $24 – $97.99 |
By making your own wall art from thrifted canvases, you can add a personal touch to your home. It’s a budget-friendly way to create something truly unique and beautiful.
Repurpose Old Doors into Statement Wall Art
Give your living space a new look by turning old doors into wall art. This DIY project lets you make unique decor that boosts any room’s style. Old doors become eye-catching statement decor that’s both beautiful and functional.
To start, gather a few basic items: an old door, paint, and a mop handle or big brush. The secret to this DIY wall art is to love the door’s natural flaws and unique look.
- Pick a door that fits your taste. Think about its size, shape, and any cool details or wear.
- Get the door ready by sanding it lightly and cleaning off dust or dirt.
- Go for a bold color and paint the door with a mop handle or big brush. This makes a modern, abstract look.
- After the paint dries, hang the door on the wall. Place it where it grabs everyone’s attention.
This project turns an old door into a beautiful, upcycled piece with a modern twist. It becomes the room’s standout feature.
“Repurposing old doors into wall art is a fantastic way to create a unique and personalized piece that reflects your individual style.”
Love the beauty of imperfections and let your creativity flow with this DIY wall art project. Turn your space into a showcase with a unique piece that celebrates upcycling.
DIY Neon Dry-Erase Board Wall Art
Get creative with this DIY project that uses dry-erase boards, water, and bright spray paints. It creates a neon artwork that will catch everyone’s eye in your home.
You’ll need a few things to make this wall art: an 11×14-inch dry-erase board, two neon spray paints (like Fluorescent Pink and Valspar Rosy Cheeks), a water-filled spray bottle, and paper towels. The trick is to spray the board with water and paint, then blot the extra paint.
Begin by placing the dry-erase board 8-10 inches from the spray paint can. Mist the board with water, then spray it with neon paint. Use paper towels to remove the extra paint. Keep doing this, switching between water and paint, until you get the neon look you want. Always work in a well-ventilated area and wear gloves and a mask when using spray paint.
To make it look like a gallery piece, make several versions of this neon art. Hang them together on your wall for a vibrant display. This DIY project will surely be a highlight in any room.
“The process might be simple, but the results are incredible – a stunning neon artwork that is sure to be a conversation starter in your home.”
DIY Wood Shim Wall Art
Turn a blank wall into a vibrant focal point with a DIY wood shim wall art project. Start by visiting your local hardware store. There, you can find wood shims and spray paint in your favorite colors.
To make this stunning DIY wall art, arrange wood shims in a chevron pattern on plywood. Try different shim arrangements and colorful decor to match your style. Once you find the perfect pattern, use a nail gun or wood glue to secure the shims.
- Gather your materials: 2 boxes of wood shims, 1×2 pine boards for framing, wood glue, and spray paint in your desired colors.
- Cut the wood shims into various lengths using a miter box and saw to create a subway tile-inspired layout.
- Arrange the shims in a chevron pattern on a 2′ x 4′ plywood base, keeping the placement random and playful.
- Secure the shims to the plywood using a Ryobi AirStrike Nailer or wood glue.
- Trim the edges of the artwork with 1×2″ furring strips and apply a distressed finish using a Ryobi Corner Cat sander.
- Finish the piece with a coat of Rust-Oleum Ultimate Wood Stain in Early American.
- Attach D-rings to the back for easy hanging, and consider using wall anchors for added stability.
This DIY wood shim wall art project is a fun and budget-friendly way to decorate a wall. With creativity and basic tools, you can make a unique piece that shows off your style.
“The best part about this project is that it’s truly customizable to your personal taste. Play with different color combinations, shim patterns, and finishing techniques to create a truly unique piece of wall art.”
The first DIY wood shim wall art piece takes about 1 hour and 40 minutes to make. Subsequent pieces take about 55 minutes. Each piece costs around $30, with most of the cost being the $26 wood frame from Goodwill.
| Material | Quantity | Approximate Cost |
|---|---|---|
| Wood Shims | 3 packs | $4 per pack |
| 1×2 Pine Boards | 1 board | $5 |
| Plywood | 1 sheet (2′ x 4′) | $10 |
| Spray Paint | 2-3 cans | $4 per can |
| Wood Glue | 1 bottle | $3 |
| Miter Box and Saw | 1 set | $10 |
| Ryobi AirStrike Nailer | 1 | Owned |
| Ryobi Corner Cat Sander | 1 | Owned |
| Rust-Oleum Wood Stain | 1 can | $8 |
With time, creativity, and the right tools, you can turn a plain wall into a stunning DIY wall art piece. So, why not try this DIY wood shim wall art project and add some vibrant colorful decor to your home?
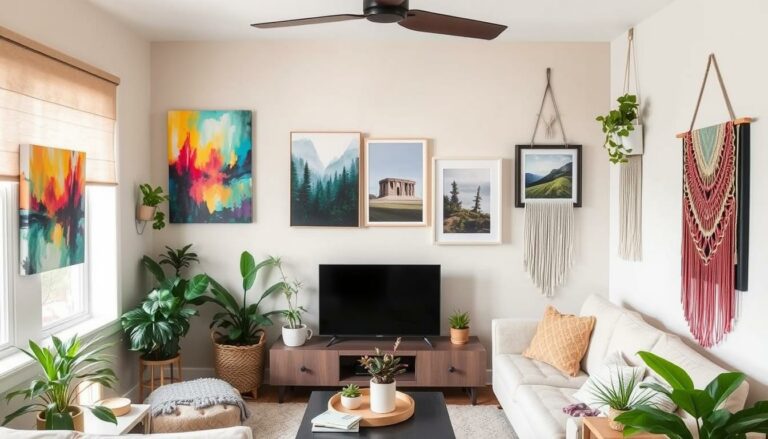
Gallery Wall with Decorative Objects
Creating a captivating gallery wall is easy. Use flea market finds or vintage-style objects. The key is to find a common theme, like circular shapes. White paint brings out the details on a cast-iron register grate. A gilded-metal picture frame has pink string backing, like a spiderweb, to hold decorative cards.
Start your DIY wall art with a big piece to anchor it. Add smaller items around it, mixing up the layout. Stick to a color palette for a harmonious look.
Include non-traditional items like textiles or sculptures for variety. Float-mounting your artwork adds a modern touch. This makes your gallery wall stand out.
Add personal touches like digital prints or photos. Etsy, Society6, and the National Gallery of Art have affordable art. This makes your DIY wall art project unique.
Plan your gallery wall design before hanging anything. Space pieces about 3 inches apart to avoid clutter. Mix frame styles to keep the display interesting. With creativity and these tips, you’ll create a stunning DIY wall art gallery.
DIY Lace and Embroidery Hoop Wall Art
Make your bedroom look better with a DIY wall art project. Use lace and embroidery hoops to create something special. This craft turns simple materials into a beautiful piece that shows off your style. By layering lace on floral fabrics in wooden hoops, you make a unique artwork.
Customize Your Textural Decor
First, pick out lace trims, doilies, or vintage linens in different designs. Choose floral fabrics that match your DIY wall art. Put the lace and fabric inside embroidery hoops. Try different ways to layer them to get the look you want.
- Trim any extra fabric, leaving 1-2 inches around the hoop’s edge.
- Put hot glue on the back of the hoop and press the fabric firmly in place.
- Let the glue dry before hanging your textural decor on the wall.
This project is quick and easy, taking less than an hour. It costs about $10, making it a great way to add DIY wall art to your room. Try different lace designs and embroidery hoops to make a unique gallery wall.

“The lightweight nature of the hoops allows for easy hanging with minimal hardware, using only a level, hammer, and small nails.”
This DIY project is a great way to be creative and change your space. Start today and enjoy making your own textural decor piece.
DIY Rope Wall Art
Make any room more inviting with a DIY rope wall art project. This easy and textured craft turns simple cardstock into a unique piece. It shows off your creativity.
You’ll need a few things to start: 3 feet of 1/2-inch-wide cotton rope, a piece of scrap wood or cardboard, and acrylic craft paint. First, glue the rope onto the wood or cardboard in a pattern you like. Then, paint it lightly with acrylic paint and press it onto cardstock.
To get a striking two-tone look, do it again with a different color. Twist the rope a quarter-turn before pressing it onto the cardstock. Let the paint dry, then frame your DIY rope wall art to show it off.
This textural project brings depth and interest to your DIY home decor. It’s a great way to express your artistic side. Try different rope thicknesses, patterns, and colors to make a piece that fits your space.
“The beauty of this DIY wall art project lies in its simplicity and versatility. With a few inexpensive materials, you can transform a plain surface into a stunning visual display.”
Whether you’re experienced or new to crafting, DIY rope art is a fun project. It adds handmade charm to your home. So, get your supplies and create a unique and textural piece of wall art that will enhance your space.
DIY Pixel-Inspired Wall Art
Unleash your inner artist and create stunning, custom pixel-inspired wall art for your home. This DIY project turns a simple plywood or MDF panel into a vibrant, personalized art piece.
To start, sand and clean your wood panel for a smooth surface. Use a pencil to mark a grid of squares on it. Choose craft paints in a cohesive color palette, from light to dark shades.
- Assign a paint color to each square, with lighter hues at the bottom and darker tones towards the top.
- Tape off the squares and paint them carefully, letting each dry before moving on to the next.
- After painting all squares, remove the tape to see your unique, pixel-inspired wall art.
This DIY project is budget-friendly and highly customizable. Try different color combinations, grid sizes, and even add stencils or freehand designs. This way, you can create a unique piece that matches your home’s decor.
| Materials | Tools |
|---|---|
|
|
Embrace your creativity and add a personal touch to your living space with this simple yet stunning plywood project. Create your own DIY wall art, pixel art, and custom decor.
DIY Framed Jewelry Wall Art
Showcase your cherished vintage jewelry or family treasures by creating a unique and personalized framed wall art. With just a few inexpensive supplies from the flea market, you can transform ordinary frames into stunning jewelry displays that double as functional art.
Jewelry Showcased with Style
Start by selecting a range of vintage frames in varying sizes, from 3″ x 5″ to 16″ x 19″. Outfit these flea market finds with fabric, ribbon, and glass knobs to create a visually appealing and personalized arrangement. The key is to experiment with different textures and materials to showcase your cherished jewelry pieces, such as earrings, necklaces, brooches, and bracelets.
To assemble your DIY wall art, begin by lining the frames with a plush velvet fabric, costing around $17.99 per yard. This backdrop will not only complement your vintage jewelry but also provide a secure surface for attaching the pieces. Once the fabric is in place, strategically arrange your flea market finds and vintage decor within the frames, using a strong crafters’ glue like E6000 to secure them.
- Select a range of inexpensive flea market frames in various sizes
- Line the frames with velvet fabric to create a luxurious backdrop
- Arrange your cherished jewelry and vintage treasures within the frames
- Secure the pieces using a strong crafters’ glue like E6000
- Add decorative elements like ribbon, buttons, or glass knobs to enhance the design
The result is a stunning and functional DIY wall art piece that allows you to showcase your jewelry storage in a visually appealing way. Hang this personalized artwork in your bedroom, living room, or any space in need of a touch of vintage charm and personality.

DIY Projects
Turning your living space into something special with DIY projects is easy. You can add a personal touch with creative crafts or make home decor that shows off your style. DIY wall art projects offer endless possibilities.
For example, you can turn a thrifted canvas into a beautiful abstract art piece. Just a few strokes of paint can make it a unique masterpiece. It will instantly make your space look better.
Want to tackle a bigger DIY project? Try turning an old door into a wall art piece. It’s a fun way to personalize your art and breathe new life into old furniture.
If you love a bit of fun, try the DIY neon dry-erase board art project. Mix vibrant spray paints with water on a dry-erase board. You’ll get a stunning piece that’s also useful.
No matter your skill level or favorite creative crafts, there’s a DIY project for you. So, let your creativity shine and turn your home into a showcase of your personalized art.
DIY Embroidery-Inspired Wall Art
Make your living space stand out with a DIY embroidery-inspired wall art piece. This project lets you add your personal touch to your home. Turn simple plywood into a beautiful piece that looks like intricate embroidery.
First, get your materials ready – two 2×4-foot plywood sheets, acrylic paints, a straight edge, and a water-based polyurethane spray. Use the straight edge to draw a grid of 1×1-inch squares on the plywood. Then, paint “X” shapes in the squares with acrylic paints, following a free embroidery-inspired pattern. Let the paint dry completely before moving on.
After that, spray the panels with water-based polyurethane to seal and protect your DIY wall art. Finally, attach the two plywood panels together with wood glue and furring strips. Hang your artwork using French cleats for a professional look.
This custom decor project lets you create a unique piece for your walls. You can choose bold colors or soft hues. Either way, your embroidery-inspired wall art will add charm to any room.
“Embrace your inner artist and transform ordinary plywood into a stunning, personalized wall display.”
Conclusion
DIY wall art projects are a great way to change your space and make it your own. You can use thrifted canvases, old doors, or simple materials like wood and rope. This lets you create affordable and eye-catching art for your home.
By being creative and trying new things, you can turn blank walls into unique pieces. These pieces will make your space truly special and yours alone.
While DIY projects might need trips to the hardware store and tools, the results are worth it. Studies show DIY can save homeowners 50% to 80% compared to hiring pros. With online tutorials, even beginners can make art that looks professional.
So, if you want to change a thrifted canvas, use an old door, or try new materials, go for it. Your DIY wall art will not only make your home look better. It will also add a personal touch that you can be proud of.
FAQ
What are some easy DIY wall art projects to personalize my space?
How can I turn a thrifted canvas into unique abstract wall art?
What can I do with old doors to create DIY wall art?
How can I make neon dry-erase board wall art?
What can I do with wood shims to make DIY wall art?
How can I create a gallery wall with decorative objects?
What can I do with lace and embroidery hoops to make DIY wall art?
How can I use rope to create DIY wall art?
What materials can I use to make pixel-inspired DIY wall art?
How can I display my jewelry as DIY wall art?
What other DIY projects can I try to personalize my space?
Source Links
- 15 DIY Wall Art Projects for a High-End Look on a Budget – https://www.bhg.com/decorating/do-it-yourself/wall-art/cheap-diy-wall-art/
- 32 DIY Wall Art Projects That Look Fancy But Anyone Can Do – https://www.thespruce.com/diy-wall-art-5536853
- Creative And Unique DIY Wall Art Ideas – https://thediymommy.com/creative-and-unique-diy-wall-art-ideas/